Showing posts with label Web Programming. Show all posts

Tuesday, November 27, 2018

Prestashop 1.7.4.2 - How to add bing, google, alexa meta authentication key

Search engine optimization is a very important part of any website and verifying them using the webmaster tools is one of them. However, not many people know how to add the meta name authentication on the PrestaShop 1.7.4.2 classic template. Some people recommend adding it to the header.tpl but when I actually tested that is the correct place where to enter the authentication key. Follow this tutorial how it can be done easily. Assuming that we are going to add bing meta authentication key

1. Use FileZilla FTP login to the Prestashop Server directory files

2. Go to this directory /themes/classic/templates/_partials

3. Download and edit the head.tpl file using Notepad++

4. Look for the code as below and enter the Bing webmaster tools authentication key as highlighted in red.


{block name='head_seo'}
  <title>{block name='head_seo_title'}{$page.meta.title}{/block}</title>
  <meta name="msvalidate.01" content="F276D79EF8C2C69F5F83C0C760516F41" />
  <meta name="description" content="{block name='head_seo_description'}{$page.meta.description}{/block}">
  <meta name="keywords" content="{block name='head_seo_keywords'}{$page.meta.keywords}{/block}">
  {if $page.meta.robots !== 'index'}
    <meta name="robots" content="{$page.meta.robots}">
  {/if}
  {if $page.canonical}
    <link rel="canonical" href="{$page.canonical}">
  {/if}
  {block name='head_hreflang'}
      {foreach from=$urls.alternative_langs item=pageUrl key=code}
            <link rel="alternate" href="{$pageUrl}" hreflang="{$code}">
      {/foreach}
  {/block}
{/block}

5. Once it is done save the file and re-upload to the same directory to replace the old one.

6. After that browse to your Prestashop store

7. On the store right click the mouse and click "View page source" or "View Source Code"

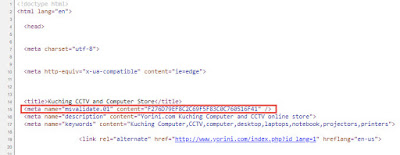
8. Now search for the authentication key in this example <meta name="msvalidate.01" content="F276D79EF8C2C69F5F83C0C760516F41" /> you will see it is within the see image below

9. On the Bing authentication page click Verify and it should be successful. The same authentication meta tag verification can be done for Google, Alexa, Yandex webmaster tools
prestashop bing google alexa authentication key

Monday, November 26, 2018

Prestashop 1.7.4.2 How to remove / disable product price drop and best sales

If you are installing new Prestashop 1.7.4.2 module and start fresh in e-commerce online store you don't have any activity just yet especially regarding best sales and price drop. So in this case usually we will remove or disable it until sometimes there are such activity occurs. In this tutorial, we going to do just that how to remove the Product footer for a price drop and best sales from the classic template.

1. Login to Prestashop Back office admin

2. Go to Modules >> Modules and Services >> Search for Link List and Configure

3. Edit the Product list


4. On the product page list uncheck the Price Drop and Best Sales and Save

5. Then browse to the Prestashop store the link should be removed from the footer link.

prestashop 1.7.4.2 remove best sales and price drop from footer link

Thursday, November 22, 2018

Prestashop 1.7.4.2 - How to remove category block header classic template

The category block header in the Prestashop sometimes is too big and used up unnecessary space that could prevent the customer to see the product - especially when a computer has a very small screen the first thing they see when browsing to the category is the header block first as it covers up quite big space. So we are going to remove this from the PrestaShop 1.7.4.2 classic template to clear up spaces and give the product listing a priority. Follow the tutorial guide as below how to remove it.

remove block category header from prestashop 1.7

1. Login to FileZilla FTP and locate this file in the directory .../themes/classic/templates/catalog/listing

2. View / Edit the category.tpl file using Notepad++

3. Edit the code as below


{extends file='catalog/listing/product-list.tpl'}

{block name='product_list_header'}
    <div class="block-category card card-block hidden-sm-down">
      <h1 class="h1">{$category.name}</h1>
      {if $category.description}
        <div id="category-description" class="text-muted">{$category.description nofilter}</div>
      {/if}
      {if $category.image.large.url}
        <div class="category-cover">
          <img src="{$category.image.large.url}" alt="{if !empty($category.image.legend)}{$category.image.legend}{else}{$category.name}{/if}">
        </div>
      {/if}
    </div>
    <div class="text-sm-center hidden-md-up">
      <h1 class="h1">{$category.name}</h1>
    </div>
{/block}

Edit / remove the red code above and make it only as below
{extends file='catalog/listing/product-list.tpl'}

{block name='product_list_header'}
   <div class="text-sm-center hidden-md-up">
   </div>
{/block}

4. Save the file and re-upload to the same directory and replace the old one

5. Login to prestashop back office Advanced Parameters >> Performance >> Clear Cache

6. Now browse to the shop the block header should be disabled

Thursday, November 15, 2018

How to make code container box using css for blogger

Putting raw codes on blogger is a total mess and it scatters everywhere without structure. That's why people who are good at javascript and CSS coding would make a special box where to put the codes so that it looks very nice and organized. In this tutorial, we are going to make simple code container using CSS which requires very minimal code to use. Follow the tutorial below how it can be done. The code in below shows the example of how the code is presented in CSS box to make it looks good.

Step 1:

Login to Blogger admin and click on "Theme" - then click on "Customise" >> Advanced  >> Add CSS. Copy and paste the code below and save it.


pre {
    overflow-x: auto;
    padding: 1.25em;
    border: 1px solid #069;
    border-left-width: 5px;
    margin: 0 0 1.38888rem;
    font-size: .88888em;
    white-space: pre;
}

Step 2:

Once everything is saved you can start to use the container - and to test whether it is working to create a sample post and past the HTML code below which pulled the CSS style format. The write any code in the "CODE HERE" and when it is published it looks like below.

<pre><code class="lang-css">
CODE HERE
</code></pre>

To save time from typing / copying the same code all over again - you can set it in the preset template so that everytime you post it is already there for you to use. This can be done by setting in the Blogger admin. Go to Setting >> Post, Comments and sharing and copy the code in the post template section as shown below and "Save Settings".

blogger post css code container box.

Once that is done whenever you create a post it is there for you to use and just any codes in the "CODE HERE" as shown below.

css box

You are done with that - and write any javascripts, java, css, or html inside the box and it is beautifully presented and well organized as the above.

Wednesday, November 14, 2018

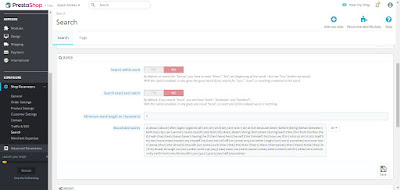
Prestashop 1.7.4.2 - How to change the search auto complete keyword length

Prestashop 1.7.4.2 auto-complete search feature is very handy especially when you have a large database of products - allows the users to search the item quickly as suggested by the keywords that exist in the DB. It is one of the most important features that speed up the customers' intention to look through the product list in the store.

However, the default auto-suggested keywords are set to 3 characters - which means it requires the visitors to type at least 3 words in order for the suggestion to pops up. We can make that more flexible by changing it to 1 character so it is very easy to give an idea to the potential buyers what available in the store.

Follow this tutorial guide how to set the autocomplete suggest keyword to 1.

1. Login to the Prestashop back office administration

2. Go to Configure >> Shop Parameters >> Search then change the "Minimum word length (in characters) to 1 keyword.

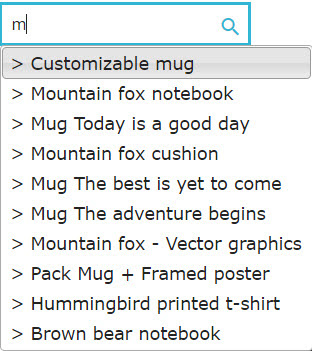
3. Go browse to your shop and then type 1 word it should auto suggest all the items that contain the character you typed in.

auto complete suggest

auto suggest keywords

Tuesday, November 13, 2018

Prestashop 1.7.4.2 - How to use 3D background image for the shop

One of the ways to attract customers is to have an attractive background image - and this tutorial will show you how to add a 3D perspective background image of a shopping mall that makes your online store items look like inside a mall. I am going to demonstrate this on Prestashop 1.7.4.2 and follow the guide below.


1. Use FTP I am using FileZilla

2. Look for the folder .../htdocs/themes/classic/assets/CSS

3. Open / edit the custom.css file using notepad++

4. Add this code to the custom.custom css file

#wrapper {
background-color: none;
background-image: url("https://sixtrees3d.files.wordpress.com/2014/03/concierge.jpg");
opacity: 0.8;
background-size: cover;
background-repeat: no-repeat;
background-size: none;
}

Note: You can change the url of any image where it is hosted by replacing the highlighted in red

5. Now save the file and re-upload to the same directory and overwrite the existing custom.css in the server using FileZilla FTP

6. Then login to the PrestaShop admin back office

7. Under Configure > Advanced Parameters > Performance click on "Clear Cache" button

8. Now browse to the shop you will see you will view the shop background looks as below. Click to enlarge the image you will the as if the background realistic within a mall since it is using 3D perspective

prestashop 1.7 3D background image realistic

Sunday, November 11, 2018

Prestashop 1.7.4.2 - How to remove prestashop.com hyperlink from the copyright

Earlier I have discussed how to change the Copyright words on the PrestaShop 1.7.4.2 footer on this blog article "How to remove copyright words". However, that is only part of the removal - and if you click on that link it will lead to www.prestashop.com page.So in this tutorial guide we going to remove, edit, or change the hyperlink target of the copyright words from the classic theme template

1. Login to Prestashop Template directory using FileZilla FTP

2. Locate this directory .../themes/classic/templates/_partials/

3. Edit the footer.tpl using NotePad++


4. Find this line in the file the link as below and change it to the destination url of your shop


 <a class="_blank" href="http://www.prestashop.com/" target="_blank"></a>
5. Once done upload the file to the same directory and replace the existing one.

6. Then open a browser and login to the back office

7. Go to Advanced Parameters > Performance > Click "Clear Cache"

8. Now browse to your shop and click on the copyright link it should leads to your store instead.

prestashop 1.7 change copyright link

Prestashop 1.7.4.2 - How to make divider for top menu link and hover effect

The original classic template of the Prestashop 1.7.4.2 has a very big potential to be as good as an expensive template from the Template Monster. However, you have to know how to edit the CSS and adjust all the style of the looks. This time we are going to make the hover effect and divider to the top menu to make it looks attractive. As always we are going to use the custom.css - so not to disturb the original css in the Prestashop Template.

1. Use FTP I am using FileZilla

2. Look for the folder .../htdocs/themes/classic/assets/CSS

3. Open / edit the custom.css file using notepad++

4. Add the following CSS code - where the first code is to add border-right as the menu divider with the size of vertical line 1px. The second CSS code is to add the hover effect to the menu you can change the background-color to any HTML color that you prefer.


/*Top menu border divider*/

#header .header-top a[data-depth="0"] {
font-size: 20px;
border-right: 1px solid #ff9a52;
color: #ff9a52;
}

/*Top menu hover effect*/

#header .top-menu a[data-depth="0"]:hover {
text-decoration: none;
background-color: #f1f1f1;
border-radius: 5px;
}

5. Save the custom.css and re-upload to replace the existing one via the FileZilla FTP.

6. Then login to the PrestaShop admin back office

7. Under Configure > Advanced Parameters > Performance click on "Clear Cache" button

8. Now browse to the shop you will see the menu divider line and also hover your mouse to the menu to view the hover effect.

prestashop 1.7 menu divider border line and hover effect

Prestashop 1.7.4.2 - How to make frame hover effect on product container classic template

The original classic template looks very plain especially the product container - however, you can change it to make it looks lively by adding a hover effect to the frame when a user hovers the mouse on the product. How this can be done is by adding some CSS code to the custom.css - follow this tutorial how to make it.

1. Login to your FTP I am using FileZilla

2. Look for the folder .../htdocs/themes/classic/assets/CSS

3. Open / edit the custom.css file using notepad++

4. Add the following CSS code - where the code is to make the margin of the product container to 2px to make it stand out. The second code is to add background hover color in this case color is orange #fe9a52


/* product container article padding 4px to make the hover effect more obvious*/

#products .product-miniature, .featured-products .product-miniature, .product-accessories .product-miniature, .product-miniature .product-miniature {
margin: 0px;
padding: 2px;
}

/* product container hover effect */

article.product-miniature.js-product-miniature:hover {
background: #fe9a52;
}
5. Save the custom.css and re-upload to replace the existing one.

6. Then login to the PrestaShop admin back office

7. Under Configure > Advanced Parameters > Performance click on "Clear Cache" button

8. Now browse to the shop and hover to the container image it should show orange color frame when hovering on it.

prestashop 1.7 add hover effect to product container

Saturday, November 10, 2018

How to use beautiful Nunito font from Google api on blogger

There are quite a number of beautiful font series provided by the Google API. There are easy to read and not very constraint to the eyes of the reader - as you can see on this Blogspot it is using font-family called "Nunito" - this is just one of them and they are few more to choose from as Roboto, Open Sans, Lato, Montserrat, Source Sans Pro, koHo to name a few.

So, in this case, we are going to use "Nunito" for example - follow this tutorial how to put it in the Blogger template.

1. Login to the blogger admin

2. Go to Theme > Edit HTML

3. In between <head> </head> enter this API
<link href="//fonts.googleapis.com/css?family=Nunito" rel="stylesheet" type="text/css"></link>

blogger nunito font from google api

4. Save the edited theme and "Back"

5. Now still on the "Theme" tab click on "Customise"

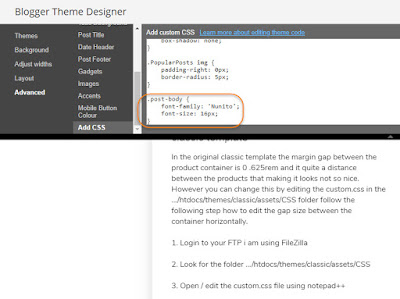
6. Go to Advanced > Add CSS inside the custom CSS enter this code below and save it


.post-body {
font-family: 'Nunito';
font-size: 16px;
}
apply nunito font to blogger

7. You can see the word preview changes and play around with the font-size whichever suit your preference. You are technically Done!

Prestahop 1.7.4.2 - How to make reduce margin gap in between product container in classic template

In the original classic template the margin gap between the product container is 0 .625rem and it quite a distance between the products that making it looks not so nice. However you can change this by editing the custom.css in the .../htdocs/themes/classic/assets/CSS folder follow the following step how to edit the gap size between the container horizontally.

1. Login to your FTP i am using FileZilla

2. Look for the folder .../htdocs/themes/classic/assets/CSS

3. Open / edit the custom.css file using notepad++

4. Add the following css code edit it to 2px or up to your preference how many pixel do you want


#products .product-miniature, .featured-products .product-miniature, .product-accessories .product-miniature, .product-miniature .product-miniature {
margin: 0 .2px;
}

5. Save the custom.css and re-upload to replace the existing one.

6. Then login to the prestashop admin back office

7. Under Configure > Advanced Parameters > Performance click on "Clear Cache" button

8. Now the margin gap horizontal in the classic template should be reduced to closer to one another.

Prestashop how to make the margin gap closer between product container


Prestashop 1.7.4.2 - How to remove hover line on classic template

The original classic template of the Prestashop 1.7.4.2 comes with the quick view thumbnail. It pops up when hovering over the product container - and it looks very annoying because it does not bring many purposes to the product on the show. However, it can be disabled the quick view feature by editing it in the product.tpl

After doing that there will no more hover element but there is one tiny thing left which the 128px long and 1px wide line and when you hover it keeps popping up. That is something not very good to see on the product container. Fortunately there is a way how to remove the hover line and follow the tutorial step below.

1. Open the Custom.css using FileZilla FTP and edit it using NotePad++

2. Copy CSS code below into the custom.css style file


#products .thumbnail-container:focus .product-description:after, #products .thumbnail-container:hover .product-description:after, .featured-products .thumbnail-container:focus .product-description:after, .featured-products .thumbnail-container:hover .product-description:after, .product-accessories .thumbnail-container:focus .product-description:after, .product-accessories .thumbnail-container:hover .product-description:after, .product-miniature .thumbnail-container:focus .product-description:after, .product-miniature .thumbnail-container:hover .product-description:after {
    border-top: none;
}

3. Save and re-upload to replace the existing one

4. Then login to the prestashop admin back office

5. Under Configure > Advanced Parameters > Performance click on "Clear Cache" button

6. Now browse to the prestashop and hover on the product container image the hover line should be gone.

how to remove hover horizontal line on prestashop quick view

Wednesday, November 7, 2018

Prestashop 1.7.4.2 - How to fix image not showing due to pagespeed

What is pagespeed module?


The pagespeed module is responsible for image compression that makes it load faster on Prestashop and thus increase the speed performance of your store significantly.

The problem of pagespeed module in Prestashop


However, not many people realize that the mod_pagespeed module use by the PrestaShop actually can cause very much headache to the user when uploading new images to their e-commerce site. Some people tweak image permission from 775 to 664 or whatsoever and clear cache including clearing cache of the pagespeed module via SSH console. All of these eventually solve the problem once and after reloading the image is not showing again.

This is what happens when upload image to the Store Contact and About us page of the store. After uploading the new image through the back office it works once when browsing the page - but it will be gone missing when reloading the same page again. After searching tutorial solution on Google like changing the CHMOD permission of the image from 775 to 664 or the other way around including clear cache as well as clearing cache of the pagespeed via SSH. After performing those action it fixed the first time reload but the next it will be missing again.

From the Chrome or Mozilla developer tools I can see that the image URL has been modified by the pagespeed like so with 404 ERROR on the browser alert.

<img src="http://xx.xxx.xxx.xxx/img/st/x1-stores_default.jpg.pagespeed.ic.NxmzWLdzMI.webp" alt="product" title="product">


Notice the image becomes like this: x1-stores_default.jpg.pagespeed.ic.NxmzWLdzMI.webp - due to the pagespeed compression. And if I change the URL to the actual image URL like so 1-stores_default.jpg on the developer debugging it will load correctly.

<img src="http://xx.xxx.xxx.xxx/img/st/1-stores_default.jpg" alt="product" title="product" data-pagespeed-url-hash="377239180" onload="pagespeed.CriticalImages.checkImageForCriticality(this);">

This is how I found out the pagespeed compression module is the real problem in this missing image case for Prestashop 1.7.4.2

How to solve the pagespeed image not showing?:


In order to fix the problem, we need to use FTP to access the directory where the file of pagespeed is located. In this case, I am using FileZilla to access the public location of the file in bitnami Google Cloud server.

1. Login to the server via FileZilla FTP

2. Local /opt/bitnami/apache2/conf/httpd.conf file in the directory

3. Edit the file using NotePad++

4. Now comment out these two lines in the httpd.conf file

Include conf/pagespeed.conf to read like so #Include conf/pagespeed.conf
Include conf/pagespeed_libraries.conf to read like so #Include conf/pagespeed_libraries.conf

5. Save the file and re-upload to the server via FTP again

6. Now open the Bitnami Virtual Machine Vault and Launch the SSH Console in a new browser

7. Once the console loaded restart the apache server using this command: sudo /opt/bitnami/ctlscript.sh restart apache

8. Now reload the page of Prestashop that having the missing image it should show all the time no matter how many times you visited or load the site.

Now if you inspect the element using developer tools on chrome or mozilla firefox you will the image is now loading its normal url without the compressed pagespeed element in it like so

<img src="http://xx.xxx.xxx.xxx/img/cms/product%20cctv%20and%20computers.jpg" alt="kuching cctv" width="400" height="400" />

There could be a better solution than this rather than disable the pagespeed but I am not too sure what it is. Perhaps tweaking the php logic in the one of those file might do the trick but you need it to work urgently the above solution is the fastest you can do.

Monday, November 5, 2018

Prestashop 1.7.4.2 - How to edit about us, delivery, legal notice pages

After installing Prestashop 1.7.4.2 you may want to edit all the necessary settings and pages to suit your desired store outlooks. The following pages links are part of the minor importance of the Prestashop that required to be modified.

1. Delivery
2. Legal-notice
3. terms and conditions of use
4. about us
5. secure payment


Follow this tutorial on how to make changes to the pages.

1. Login to the Prestashop admin control panel

2. Under IMPROVE > Design > Pages

3. Edit each of the pages listed above and Save

prestashop how to modify about us link pages

You can also add more links to external pages by doing the following step

1. Login to Prestashop admin control panel

2. Under IMPROVE > Modules > Modules & Services

3. Search for theme modules "Link List" and click Configure

4. Edit Our Company

5. Enter name and url of the link and click Add then Save

how to add more link or remove link under our company

Prestashop 1.7.4.2 how to edit stores open hours, branch address, and contacts

Stores address, branches, and open hours can be an important element of the e-commerce online store. Therefore it is necessary to setup it up properly and this tutorial will show you how to change the necessary information for Prestashop 1.7.4.2


1. First login to the Prestashop Admin Control Panel

2. Go to CONFIGURE > Shop Parameters > Contact

3. Click on the Stores Tab and update or modify Store Branches, Address, Contact, Shop open business office hours and Images and Save

Saturday, November 3, 2018

Prestashop 1.7.4.2 how to backup file and database

One of the most important aspects of security is back up - and it's a must do action on any website development just in case anything went wrong like the server crashed, hackers, or anything that can happen to the website it applies to e-commerce hosting like Prestashop.

However one might ask how to back up the file where to start and what needs to be done especially for Prestashop that is hosted in Google clouds web server via the Bitnami. In this tutorial, we are going to learn how to do that for Prestashop 1.7.4.2 version.

Step 1: What do we are the thing to backup?

There are 2 most important component of a website and this include the Prestashop e-commerce. The first one is the template or the shop structures it contents of all the file php, javascript, css, html, images, etc. These files responsible for the logic and outlooks or simple the theme of the website. The second one is the database which holds all the information about the products, categories, users password, username, etc.


So the template (theme) backup as a precautionary measure that any changes made to the logic files (javascript, php) or the theme looks like CSS and HTML might break somewhere. This can happen if you are not familiar with the structure or the proper coding of the whole theme. Therefore before making any major changes to any of the codes in the file, it is wise to make a backup first - so when anything breaks in between you can simply restore the original one from the backup.

Likewise, for the database - it may be corrupted due to server updates by the web-hosting provider or due to data from the users and administrator. Therefore a backup would the savior to the website.

Step 2: How to back the theme files and database?

Unfortunately, there are no easy way to backup both the database and files at once - and we have to be done separately in two steps.

To back up the theme files it is recommended to use FTP application like the FileZilla as it can be done easily to download the entire files at once. How to access the bitnami virtual machine via FileZilla FTP is explain in this blog article "How to access google cloud bitnami using filezilla". Download all the related prestashop theme files from the hosting server via FileZilla and store in the local computer desktop folder.

In order to backup the database - access to the PHP admin control panel is required. Follow this blog article tutorial how to access the admin control panel via putty application " How to access prestashop PHP my admin in bitnami google cloud hosting on windows". Once access granted to the PHP admin control panel there is an option to backup the SQL database pretty easy to follow right on the control panel itself. Restoration of database also must go through the PHP admin page.

So, in summary, the back up will save your time time to deal with the unexpected problem for the Prestashop e-commerce site both in the module theme template and the database.

How to access prestashop PHP my admin in bitnami google cloud hosting on windows

In order to access the PHP admin in the bitnami google cloud hosting it takes quite a complicated step but luckily it is no impossible and getting easier after doing it a few times. Note that this is a very important step to keep in mind because the PHP admin allows database backup and restore less hassle.


Follow this tutorial step how to access the PHP admin in bitnami Google cloud server:

Step 1: Putty Application.

In order to SSH to the bitnami server we need a puTTY app installed on windows - so I am using Windows 10 32-bit. You can download the installer from puTTY website if you don't have it yet.

Step 2: Login to Google Cloud Server

a. Login to Google cloud console > Compute Engine > VM Instances
b. Copy the VM External IP:xxxxxx of the hosted site and bitnami-base-password: xxxxxx and copy them to a notepad for later use.

how to backup prestashop database hosted in Google clouds bitnami server - cara backup prestashop database dari bitnami

Step 3: Login to Bitnami

a. Login to Bitnami Virtual machine click on Unlock Vault and click Virtual Machine where the PrestaShop is hosted - download the PPK key and keep it on safe folder in your computer for later use in puTTY configuration

how to restore database in phpmyadmin control panel prestashop hosted on Google bitnami

Step 4: Setting up Putty Configuration

a. Open Putty Application
b. Click on Session Under Host Name (or IP address) field enter the external ip address that you get from step 2 in Google Cloud server then enter the same ip address in the Save Sessions field and click Save.

setup SSH connection using putty to bitnami google cloud prestashop server

c. Click Connection > Data -- Auto-login username field enter bitnami

putty bitnami login username and password

d. Click SSH > Auth -- Then browse your pc and find the bitnami PPK key obtain from Step 3

bitnami ppk key for ssh using putty

e. Still under SSH click Tunnels and enter 8888 in the Source port and then enter localhost:80 in the Destination field and click Add

putty tunnel setting ssh for bitnami google cloud prestashop

f. The setting is done - now click Open a command prompt will pop up as below. Do not close the command prompt and leave it open that way and move on to the next step.


Step 5: Login to the PHP admin

a. Open any browser and enter http://127.0.0.1:8888/phpmyadmin
b. enter username: root and password: xxxx (obtained from Google cloud server in step 2)

You should be able to access PHPmyadmin control panel and backup the SQL database - and download it to your desktop. Restoring database also can be done through the admin control panel.

how to access phpmyadmin via putty to the bitnami google cloud

Sunday, January 7, 2018

How to make desktop pc run http://localhost on web-browser using xampp and notepad++ on windows 10

How to run notepad++ file locally using http://localhost/file.html on web-browser without running it on the server. This will give you the privilege to develop web-page locally and it loads almost instantly because there is no need for login what so ever.

Step 1:

You will need to install the Xamp which you can download from SourceForge which you can download here: https://sourceforge.net/projects/xampp/?source=directory and this work for both Windows 32-bit and 64-bit version.


Step 2:

Once it is downloaded install the Xampp directly on C:\ drive instead of program files to make it easier to locate later on.

Step 4:

After the Xampp is installed on C:\ drive the location should be like so C:\xampp

Step 5:

Now download Notepad++ and it's free you can find it from its official website https://notepad-plus-plus.org/download/v7.5.4.html. This time you have to choose either 32-bit or 64-bit depending on the Windows 10 operating system you are using. After downloaded then install the Notepad++ and it can be anywhere you preferred most commonly in programs files (by default) that is fine.

Step 6:

Now you can write HTML document and run with localhost - in order to do so you have to create a sub-folder under C:\xampp\htdocs for example web-development folder so it reads C:\xampp\htdocs\web-development. Inside the web-development folder you can create html file that you are working on to make website. For example copy the code below and paste onto NotePad++ document and save as index.html under the C:\xampp\htdocs\web-development folder that you created.


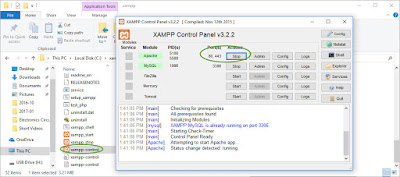
Ensure the xampp control panel open and start Apache is started see below


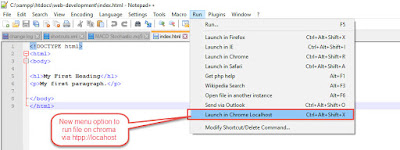
Open a chrome browser and type http://localhost/web-development/index.html the browser should read and interpret the content of the file and display it on the Chrome browser. But this will be tedious if you keep typing the address every time running the file and it takes too much time. So you will need to run the file from the NotePad++ >>Run>> launch in ...as per guide below. Without the below modification the file will run as file:///C:/xampp/htdocs/web-development/index.html and will not work for .php file or javascript.

How to run the file directly from NotePad++ >> Run >> Launch in Chrome for example


Step 1: You need to create a redirect.php file using the code below. Copy the code below to NotePad++ and save it as redirect.php under the C:\xampp\htdocs folder.

<?php
$root = $_SERVER['DOCUMENT_ROOT'];

$file = str_replace('\\', '/', $_GET['file']);
$file = str_replace($root, '', $file);

header("Location: http://localhost{$file}");
?>


Step 2: Once redirect.php is create then click on Windows Start and type %AppData% in the search box and press ENTER. This will direct to AppData>>Roaming folder. Click on NotePad++ folder and edit the shortcuts.xml using NotePad++

Step 3: Add new command in the shortcuts.xml file like so.


Step 4: Testing if it works. I am using index.html file that was created under C:\xampp\htdocs\web-development folder and run it on NotePad++ and by click on Run>> Launch in Chrome Localhost. This will run the file using Chrome browser via http://localhost/web-development/index.html


NOTE: Remember always create file or folder under C:\xampp\htdocs in order to run as localhost.

Monday, July 24, 2017

How to set github desktop version path in the environment variables settings in Windows 7

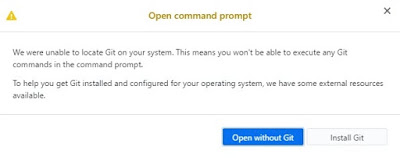
When running command prompt on the GitHub from the Repository>>Open Command Prompt it will throw and error as below:

"Open command prompt

We were unable to locate Git on your system. This means you won't be able to execute any Git commands in the command prompt.

To help you get Git installed and configured for your operating system, we have some external resources available"

There is an option to open without Git and Install Git. Neither of this option is useful because you need to run the gitbash (git command prompt) and Git already install in the system (so why need to install it again).

To solve this problem you need to setup the github path in the environment variables of the windows 7

1. First you need to know where is your github installed find the git.exe. In my case it is installed in the C:\Users\\AppData\Local\GitHubDesktop\app-0.7.0\resources\app\git\cmd\git.exe. Most people are installed in their program file as such C:\Program Files\Git\bin\git.exe

2. Once you know the git.exe location now click start on Windows and right click on "Computer" then select "Properties"


3. In Properties select Advanced system settings


4. Under the Advanced tab click on Environment Variables...


5. In the Environment Variables...>Click New on System variables and Give a Variable Name is "PATH" and Variable Value 

C:\Users\\AppData\Local\GitHubDesktop\app0.7.0\resources\app\git\cmd\git.exe (This where the git.exe located folder it's the github command prompt)

Once that is done click OK and OK > OK > OK to save and rerun the Github desktop>>Repository> Open Command Prompt it should work.


Saturday, February 20, 2016

How to install plugins for Classipress 3.5.1 Theme on Bitnami server

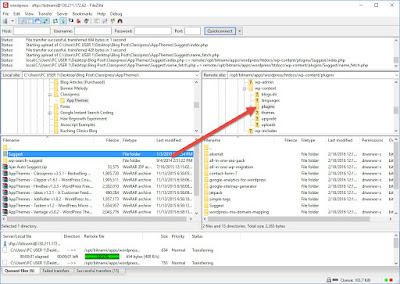
Unlike theme installation the wordpress plugins requires it to be uploaded to the server first via ftp programs before in can be installed or activated. This installation is for Bitnami server so you have to login to the ftp using file. Follow the steps below

1. Unzip the plugins to a folder

2. Open the FileZila ftp programs (How to access bitnami server using FileZilla)

3. Once the FileZilla have accessed to the server look for plugins directory in this case /opt/bitnami/apps/wordpress/htdocs/wp-content/plugins

4. Drag the unzip plugins (folder) to the the bitnami wordpress plugins directory


How to apply the plugins


1. Login to the wordpress admin page

2. Go to MySite>>Plugins

3. Search for the uploaded plugins and activate it