Showing posts with label How To. Show all posts

Thursday, February 21, 2019

How to set TV button on off for china Astro replacement remote control

The china Astro replacement remote control is really cheap like RM9 each from supersave or Mr.DIY store. To use it is pretty straight forward and there is nothing to set and it works straight away.

However, there is a TV button ON/OFF button for convenience that requires a little trick on how to set it to make it work for different brand of TV. So here is a little tutorial on how to set the TV on/off button to work.

Step 1:

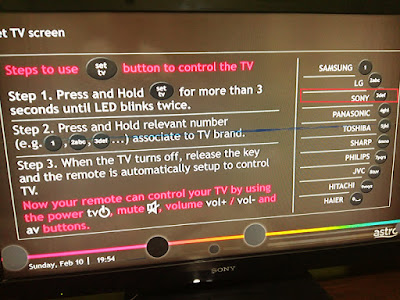
If you press the TV set button while the Astro unit is turned on you will instruction to press and hold the TV set button and press the alphanumeric number. For example, my TV is Sony I will press 3def. See the first screenshot below

Step 2:

Now you have the instruction as in Step 1. Then turn off the Astro unit don't put it on sleep mode or off from the remote because the Astro unit will still respond to the remote control. But turn it off completely like plug out the power cable.

Step 3:

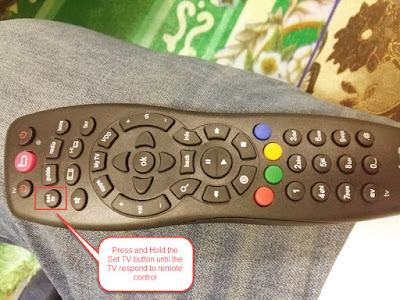
After the Astro decoder is completely turned off - now point the remote to the TV set. Make sure the TV either ON or idle/sleep mode. This way the remote can only interact with one device. Then press the set TV button and hold it for few seconds until the TV responds.

When the TV responded to the remote control - if it is ON state it will turn off otherwise if is if OFF then it will turn on by the remote control. Once the TV responded click on the alphanumeric button on the remote control based on your TV brand for example mine is SONY 3def. It's done

Now you can ON or OFF the Television set using the ASTRO remote control. Hope this helps
This remote work for normal Astro and Astro Beyond Set


Cara setting Astro remote spare butang TV ON / OFF

Tuesday, February 5, 2019

Fix Samsung Galaxy A5 unable to detect sim card

This experience happened out of the blue when suddenly my samsung galaxy a5 unable to detect the sim card network. As a result the cellphone cannot stream internet data but it can call and receive sms messages. But internet is very important these days for YouTube, Whatsapp, Facebook, TWitter and Instagram - so without the internet the smart phone is pretty low usage.

I thought when the data signal off the network might have some problem - but after a while there was still no data. Then after that restarting the A5 device but the problem still persist. Then follow this step

1. Turn off the phone

2. Take out the sim card from the phone - use a pin or small paper clip will do

3. Rub the surface of the sim card circuit to clean it

4. Put back into the phone

5. Turn on the phone

6. The signal comes back

That is how i solved my SAMSUNG GALAXY A5 network signal problem

how to fix samsung galaxy a5 cannot detect sim card

Build diy table top cost

Recently i was thinking to build my own DIY table top outside for cooking and chopping meat. This is cost just for reference.

Half Tonne of Sands + 50 pcs clay brick = RM72
Metal pole (18 meters x 2 pcs) = RM33 (RM18.50 each for 18 meters - 1 inch diameter) - Seyi Hardware (Sekama)
Wire mesh fence (dawai) = RM33 (Seyi Hardware Sekama RM21 for 4 meters + Tabuan Jaya RM12 for 4 meters)
Cement (1 bag) = RM20

Rough total = RM158

Considering this is my first time doing it - there are a lot of experience needed to make. I believe an experience and skilled person can do this way much cheaper and quicker without spending so much money and time.

The actual process:

43 bricks used = 26 each stand
Half bag of cement used - to build the brick stand
3 pcs x 4 meters metal used
8 bucket of sand - cement bucket

The actual used of materials way lesser than the acquired. - after this experience should save a lot of money to buy the materials.

membuat meja cement, cara membuat meja kongkrit, bajet membuat meja kongkrit


Where to buy engine oil for alza, myvi, viva, axia, bezza, kancil, kenari, kelisa

If you are looking where to buy perodua engine oil semi synthetic SAE 5W30 in Kuching you can find them at Perodua service center as follows.

Perodua service centre at hui sing 
garden before petronas petrol station.

Address: Lot 5023, Block 16, 
KCLD Sherip Masahor, Kuching, 93350 Kuching, Malaysia
Hours: 
Monday - Friday: 9:00 AM - 5:00 PM
Saturday: 9:00 AM - 2:45 PM
Sunday: CLOSED

Phone: +60 82-237 122

Gamma motors perodua service center 
across the main road opposite City One

Address: 8, 801-2B Jalan Tun Jugah, 
93350 Kuching, Sarawak, Malaysia

Office Hours: 
Monday - Friday: 8:00 AM - 5:00 PM
Sunday: CLOSED
Phone: +60 82-488 000

Kuching 2 Perodua 
service center at the following address

Lot 5590, Section 64, Jalan Datuk Abang Aabdul Rahim, 
Kuching Town Land District, 93450 Kuching, Sarawak, Malaysia

Office Hours:

Monday - Friday: 8:00 AM - 5:00 PM
Saturday: 8:00 AM - 12:00 PM
Sunday: CLOSED

Phone: +60 82-333 277

There are 3 types of Engine Oil and vary in price and all of them can be used by perodua cars such as alza, myvi, bezza, axia, kancil, rusa, kenari, kelisa

1. Fully Synthetic SAE OW-20 the container green in color - the price i didn't ask probably around RM120 to RM130 based on shopee's price. Not sure how many kilometers the fully synthetic oil can go or how long.

perodua engine oil fully synthetic OW-20 kuching

2. Semi Synthetic SAE 5W30 gold color container - the price is RM101 based on Gamma motors service center. The gold color engine oil will last for 10,000 km or approximately 6 months. Normally i will use this one for alza as I've been using for the past 9 years. So now you know don't change your engine too early if it hasn't reach 10,000 km yet especially if you are just a city driver.

perodua engine oil semi synthetic sae 5w30 kuching

3. Semi Synthetic SAE 530 blue color container - the price is RM88 based on Gamma motors service center. Based on perodua sales advisor the blue color engine oil will last for 5000 km or approximately 3 months half of the gold color lifespan. This should be good for old cars especially with the like of Kancil, Axia, kenari, kelisa.

perodua semi synthetic engine oil 5w30 kuching

4. Perodua genuine original engine oil filter also available for sale at Perodua Service center and this one i got from Gamma motors for RM14 which is pretty much the same as outside.

perodua engine oil filter genuine original kuching

5. How much is the basic service for Perodua Alza at the service center? The sale advisor said it's around RM180. Basic service such as pump tire, change engine oil, change engine oil filter, check battery and refill battery water, checking any part of the cars that you want them to test. If you are just changing engine oil and the oil filter it's worth it to service at 3rd party workshop like the Chop Lee Hong (Sailun tires) near sugarbun tabuan jaya cost only RM15 provided your bring your own engine oil and oil filter buy from perodua service center.
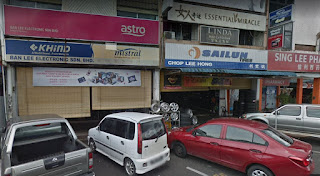
bengkel workshop tayar tabuan jaya kuching chop lee hong

kos servis alza 1000km, harga servis kereta perodua alza, servis alza 60000 km, servis alza 90000 km, alza coolant capacity, myvi engine oil 5w30, myvi 2018 engine oil, best engine oil for alza, di mana beli minyak engine perodua di kuching, beli penapis minyak perodua kuching, kedai bengkel service perodua, harga minyak sae 5w30 kuching, alza harga servis biasa di perodua
Cellphone signal detector 4G, 3G, 2G 2.7 Ghz Wideband phase detector

A very simple and good cellphone signal detector that captures 4G, 3G, 2G, EDGE, HSDPA, Radio, 433 Mhz, Bluetooth from 0 to 2.7 Ghz. The circuit is based on the RF/IF Analog Gain & Phase Detector AD8302


FEATURES (Datasheet)

Measures Gain/Loss and Phase up to 2.7 GHz Dual Demodulating Log Amps and Phase Detector Input Range –60 dBm to 0 dBm in a 50 System Accurate Gain Measurement Scaling (30 mV/dB) Typical Nonlinearity < 0.5 dB Accurate Phase Measurement Scaling (10 mV/Degree) Typical Nonlinearity < 1 Degree Measurement/Controller/Level Comparator Modes Operates from Supply Voltages of 2.7 V–5.5 V Stable 1.8 V Reference Voltage Output Small Signal Envelope Bandwidth from DC to 30 MHz APPLICATIONS RF/IF PA Linearization Precise RF Power Control Remote System Monitoring and Diagnostics Return Loss/VSWR Measurements Log Ratio Function for AC Signals cellphone detector circuit diagram


AD8302 wideband phase detector circuit diagram

Friday, January 4, 2019

How to change sliding gate roller wheel u-groove bottom

Just record for future reference: Changing the roller gate for the first time takes a bit of challenge not to mention measuring the wrong size diameter and keep going back and forth to the shop to exchange a new one. So this challenge gives a little bit of experience how to do it better next time.

A place to buy the roller Wee Yang Hardware Sdn Bhd Tabuan Jaya.

Price = RM19 each roller
Size Diameter = 6.8 cm / 68 mm ~ approximately 2.67 inches

How to do:

1. Remove screws do not lift up the gate yet. This is to prevent screws from turning both sides which requires two spanners to open it. With the gate still on the ground the screw unable to move both sides due to the weight of the gate

2. Once screw removed then removing the roller wheel from the socket then lift up. -- use brick or wood to hold the gate uplifted

3. Put in the screws then put back the gate in place - This is to prevent the screws from turning both sides when tightening the screws

change gate wheel roller

Tuesday, January 1, 2019

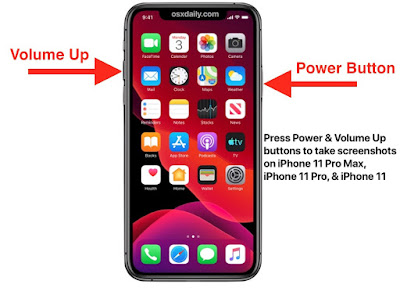
How to capture screenshot on iPhone 11

If you ever use iPhone X, iPhone XR, iPhone XS before the process of capture screenshot on iPhone 11 is exactly the same. Same as it's previous predecessor the iphone 11 doesn't come wit the home button and Apple have made it different combination of buttons to take screenshot on it.

Step 1: Press the Side button and Volume Up button

Just press the Volume Up and the Side button (Sleep/Wake button) at the same time on the iPhone device. As the you release the button a screen is captured and stored in the image gallery.

Step 2: Edit Screenshot

To view or edit the captured image - just tap on the preview icon show up at the bottom. You will then proceed to edit or crop the image as you like.

Tuesday, November 27, 2018

Prestashop 1.7.4.2 - How to add bing, google, alexa meta authentication key

Search engine optimization is a very important part of any website and verifying them using the webmaster tools is one of them. However, not many people know how to add the meta name authentication on the PrestaShop 1.7.4.2 classic template. Some people recommend adding it to the header.tpl but when I actually tested that is the correct place where to enter the authentication key. Follow this tutorial how it can be done easily. Assuming that we are going to add bing meta authentication key

1. Use FileZilla FTP login to the Prestashop Server directory files

2. Go to this directory /themes/classic/templates/_partials

3. Download and edit the head.tpl file using Notepad++

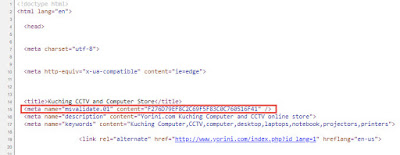
4. Look for the code as below and enter the Bing webmaster tools authentication key as highlighted in red.


{block name='head_seo'}
  <title>{block name='head_seo_title'}{$page.meta.title}{/block}</title>
  <meta name="msvalidate.01" content="F276D79EF8C2C69F5F83C0C760516F41" />
  <meta name="description" content="{block name='head_seo_description'}{$page.meta.description}{/block}">
  <meta name="keywords" content="{block name='head_seo_keywords'}{$page.meta.keywords}{/block}">
  {if $page.meta.robots !== 'index'}
    <meta name="robots" content="{$page.meta.robots}">
  {/if}
  {if $page.canonical}
    <link rel="canonical" href="{$page.canonical}">
  {/if}
  {block name='head_hreflang'}
      {foreach from=$urls.alternative_langs item=pageUrl key=code}
            <link rel="alternate" href="{$pageUrl}" hreflang="{$code}">
      {/foreach}
  {/block}
{/block}

5. Once it is done save the file and re-upload to the same directory to replace the old one.

6. After that browse to your Prestashop store

7. On the store right click the mouse and click "View page source" or "View Source Code"

8. Now search for the authentication key in this example <meta name="msvalidate.01" content="F276D79EF8C2C69F5F83C0C760516F41" /> you will see it is within the see image below

9. On the Bing authentication page click Verify and it should be successful. The same authentication meta tag verification can be done for Google, Alexa, Yandex webmaster tools

prestashop bing google alexa authentication key

Monday, November 26, 2018

Prestashop 1.7.4.2 How to remove / disable product price drop and best sales

If you are installing new Prestashop 1.7.4.2 module and start fresh in e-commerce online store you don't have any activity just yet especially regarding best sales and price drop. So in this case usually we will remove or disable it until sometimes there are such activity occurs. In this tutorial, we going to do just that how to remove the Product footer for a price drop and best sales from the classic template.

1. Login to Prestashop Back office admin

2. Go to Modules >> Modules and Services >> Search for Link List and Configure

3. Edit the Product list


4. On the product page list uncheck the Price Drop and Best Sales and Save

5. Then browse to the Prestashop store the link should be removed from the footer link.

prestashop 1.7.4.2 remove best sales and price drop from footer link

Thursday, November 22, 2018

Prestashop 1.7.4.2 - How to remove category block header classic template

The category block header in the Prestashop sometimes is too big and used up unnecessary space that could prevent the customer to see the product - especially when a computer has a very small screen the first thing they see when browsing to the category is the header block first as it covers up quite big space. So we are going to remove this from the PrestaShop 1.7.4.2 classic template to clear up spaces and give the product listing a priority. Follow the tutorial guide as below how to remove it.

remove block category header from prestashop 1.7

1. Login to FileZilla FTP and locate this file in the directory .../themes/classic/templates/catalog/listing

2. View / Edit the category.tpl file using Notepad++

3. Edit the code as below


{extends file='catalog/listing/product-list.tpl'}

{block name='product_list_header'}
    <div class="block-category card card-block hidden-sm-down">
      <h1 class="h1">{$category.name}</h1>
      {if $category.description}
        <div id="category-description" class="text-muted">{$category.description nofilter}</div>
      {/if}
      {if $category.image.large.url}
        <div class="category-cover">
          <img src="{$category.image.large.url}" alt="{if !empty($category.image.legend)}{$category.image.legend}{else}{$category.name}{/if}">
        </div>
      {/if}
    </div>
    <div class="text-sm-center hidden-md-up">
      <h1 class="h1">{$category.name}</h1>
    </div>
{/block}

Edit / remove the red code above and make it only as below
{extends file='catalog/listing/product-list.tpl'}

{block name='product_list_header'}
   <div class="text-sm-center hidden-md-up">
   </div>
{/block}

4. Save the file and re-upload to the same directory and replace the old one

5. Login to prestashop back office Advanced Parameters >> Performance >> Clear Cache

6. Now browse to the shop the block header should be disabled

Sunday, November 18, 2018

How to get free vpn for lifetime

I used to search free VPN because of the internet service provider blocked too many good sites for me see. Searching all over the place including web version of free VPN including finch VPN, betternet VPN (Betternet Scam), and all sort of free trial VPN including free SSH connection. None of them works any better as some are scams and not last for long.

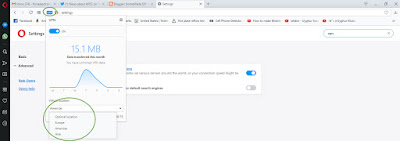
After sometimes I have forgotten all the Free VPN thingy and no interest to look further anymore, then one fine day when installing Opera browser there is somewhere that says free VPN for life Wow!!!. Once the installation was done I've quickly tested the VPN and it works like a charm - that's the best free VPN on the planet you can find with opera browser. You can choose 4 options Optimal location, Europe, Americas, and Asia depending on your preference. Anyone should use this browser and it's faster than Chrome and Mozilla firefox anyway.

How to activate Opera VPN

1. Open the Opera Browser

2. Click on the Opera logo >> Settings

3. In setting search for VPN

4. On the VPN toggle to turn on

5. Now browse any website you will see VPN logo on the left side of the browser address URL

6. To change the VPN location click on the VPN logo and select either Optimal Location, Europe, Americas, Asia it will all good.

Although the VPN might not be as fast but it really free for life - no payment required and the best of all it's better than any of the free VPN service out there.

free opera vpn


free vpn lifetime


Thursday, November 15, 2018

How to make code container box using css for blogger

Putting raw codes on blogger is a total mess and it scatters everywhere without structure. That's why people who are good at javascript and CSS coding would make a special box where to put the codes so that it looks very nice and organized. In this tutorial, we are going to make simple code container using CSS which requires very minimal code to use. Follow the tutorial below how it can be done. The code in below shows the example of how the code is presented in CSS box to make it looks good.

Step 1:

Login to Blogger admin and click on "Theme" - then click on "Customise" >> Advanced  >> Add CSS. Copy and paste the code below and save it.


pre {
    overflow-x: auto;
    padding: 1.25em;
    border: 1px solid #069;
    border-left-width: 5px;
    margin: 0 0 1.38888rem;
    font-size: .88888em;
    white-space: pre;
}

Step 2:

Once everything is saved you can start to use the container - and to test whether it is working to create a sample post and past the HTML code below which pulled the CSS style format. The write any code in the "CODE HERE" and when it is published it looks like below.

<pre><code class="lang-css">
CODE HERE
</code></pre>

To save time from typing / copying the same code all over again - you can set it in the preset template so that everytime you post it is already there for you to use. This can be done by setting in the Blogger admin. Go to Setting >> Post, Comments and sharing and copy the code in the post template section as shown below and "Save Settings".

blogger post css code container box.

Once that is done whenever you create a post it is there for you to use and just any codes in the "CODE HERE" as shown below.

css box

You are done with that - and write any javascripts, java, css, or html inside the box and it is beautifully presented and well organized as the above.

Wednesday, November 14, 2018

Prestashop 1.7.4.2 - How to change the search auto complete keyword length

Prestashop 1.7.4.2 auto-complete search feature is very handy especially when you have a large database of products - allows the users to search the item quickly as suggested by the keywords that exist in the DB. It is one of the most important features that speed up the customers' intention to look through the product list in the store.

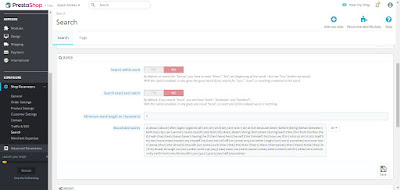
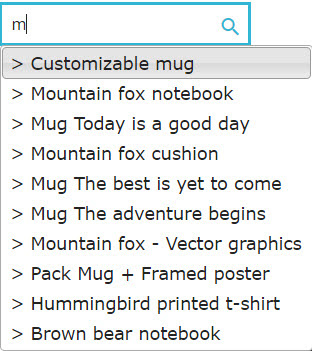
However, the default auto-suggested keywords are set to 3 characters - which means it requires the visitors to type at least 3 words in order for the suggestion to pops up. We can make that more flexible by changing it to 1 character so it is very easy to give an idea to the potential buyers what available in the store.

Follow this tutorial guide how to set the autocomplete suggest keyword to 1.

1. Login to the Prestashop back office administration

2. Go to Configure >> Shop Parameters >> Search then change the "Minimum word length (in characters) to 1 keyword.

3. Go browse to your shop and then type 1 word it should auto suggest all the items that contain the character you typed in.

auto complete suggest

auto suggest keywords

Sunday, November 11, 2018

Prestashop 1.7.4.2 - How to remove prestashop.com hyperlink from the copyright

Earlier I have discussed how to change the Copyright words on the PrestaShop 1.7.4.2 footer on this blog article "How to remove copyright words". However, that is only part of the removal - and if you click on that link it will lead to www.prestashop.com page.So in this tutorial guide we going to remove, edit, or change the hyperlink target of the copyright words from the classic theme template

1. Login to Prestashop Template directory using FileZilla FTP

2. Locate this directory .../themes/classic/templates/_partials/

3. Edit the footer.tpl using NotePad++


4. Find this line in the file the link as below and change it to the destination url of your shop


 <a class="_blank" href="http://www.prestashop.com/" target="_blank"></a>
5. Once done upload the file to the same directory and replace the existing one.

6. Then open a browser and login to the back office

7. Go to Advanced Parameters > Performance > Click "Clear Cache"

8. Now browse to your shop and click on the copyright link it should leads to your store instead.

prestashop 1.7 change copyright link

Prestashop 1.7.4.2 - How to make divider for top menu link and hover effect

The original classic template of the Prestashop 1.7.4.2 has a very big potential to be as good as an expensive template from the Template Monster. However, you have to know how to edit the CSS and adjust all the style of the looks. This time we are going to make the hover effect and divider to the top menu to make it looks attractive. As always we are going to use the custom.css - so not to disturb the original css in the Prestashop Template.

1. Use FTP I am using FileZilla

2. Look for the folder .../htdocs/themes/classic/assets/CSS

3. Open / edit the custom.css file using notepad++

4. Add the following CSS code - where the first code is to add border-right as the menu divider with the size of vertical line 1px. The second CSS code is to add the hover effect to the menu you can change the background-color to any HTML color that you prefer.


/*Top menu border divider*/

#header .header-top a[data-depth="0"] {
font-size: 20px;
border-right: 1px solid #ff9a52;
color: #ff9a52;
}

/*Top menu hover effect*/

#header .top-menu a[data-depth="0"]:hover {
text-decoration: none;
background-color: #f1f1f1;
border-radius: 5px;
}

5. Save the custom.css and re-upload to replace the existing one via the FileZilla FTP.

6. Then login to the PrestaShop admin back office

7. Under Configure > Advanced Parameters > Performance click on "Clear Cache" button

8. Now browse to the shop you will see the menu divider line and also hover your mouse to the menu to view the hover effect.

prestashop 1.7 menu divider border line and hover effect

Prestashop 1.7.4.2 - How to make frame hover effect on product container classic template

The original classic template looks very plain especially the product container - however, you can change it to make it looks lively by adding a hover effect to the frame when a user hovers the mouse on the product. How this can be done is by adding some CSS code to the custom.css - follow this tutorial how to make it.

1. Login to your FTP I am using FileZilla

2. Look for the folder .../htdocs/themes/classic/assets/CSS

3. Open / edit the custom.css file using notepad++

4. Add the following CSS code - where the code is to make the margin of the product container to 2px to make it stand out. The second code is to add background hover color in this case color is orange #fe9a52


/* product container article padding 4px to make the hover effect more obvious*/

#products .product-miniature, .featured-products .product-miniature, .product-accessories .product-miniature, .product-miniature .product-miniature {
margin: 0px;
padding: 2px;
}

/* product container hover effect */

article.product-miniature.js-product-miniature:hover {
background: #fe9a52;
}
5. Save the custom.css and re-upload to replace the existing one.

6. Then login to the PrestaShop admin back office

7. Under Configure > Advanced Parameters > Performance click on "Clear Cache" button

8. Now browse to the shop and hover to the container image it should show orange color frame when hovering on it.

prestashop 1.7 add hover effect to product container

Saturday, November 10, 2018

How to use beautiful Nunito font from Google api on blogger

There are quite a number of beautiful font series provided by the Google API. There are easy to read and not very constraint to the eyes of the reader - as you can see on this Blogspot it is using font-family called "Nunito" - this is just one of them and they are few more to choose from as Roboto, Open Sans, Lato, Montserrat, Source Sans Pro, koHo to name a few.

So, in this case, we are going to use "Nunito" for example - follow this tutorial how to put it in the Blogger template.

1. Login to the blogger admin

2. Go to Theme > Edit HTML

3. In between <head> </head> enter this API
<link href="//fonts.googleapis.com/css?family=Nunito" rel="stylesheet" type="text/css"></link>

blogger nunito font from google api

4. Save the edited theme and "Back"

5. Now still on the "Theme" tab click on "Customise"

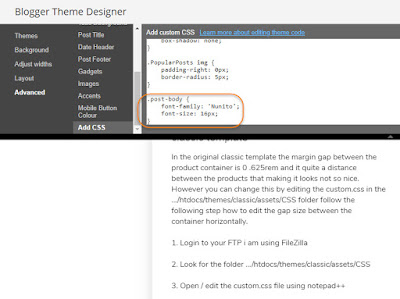
6. Go to Advanced > Add CSS inside the custom CSS enter this code below and save it


.post-body {
font-family: 'Nunito';
font-size: 16px;
}
apply nunito font to blogger

7. You can see the word preview changes and play around with the font-size whichever suit your preference. You are technically Done!

Prestahop 1.7.4.2 - How to make reduce margin gap in between product container in classic template

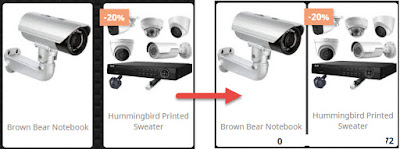
In the original classic template the margin gap between the product container is 0 .625rem and it quite a distance between the products that making it looks not so nice. However you can change this by editing the custom.css in the .../htdocs/themes/classic/assets/CSS folder follow the following step how to edit the gap size between the container horizontally.

1. Login to your FTP i am using FileZilla

2. Look for the folder .../htdocs/themes/classic/assets/CSS

3. Open / edit the custom.css file using notepad++

4. Add the following css code edit it to 2px or up to your preference how many pixel do you want


#products .product-miniature, .featured-products .product-miniature, .product-accessories .product-miniature, .product-miniature .product-miniature {
margin: 0 .2px;
}

5. Save the custom.css and re-upload to replace the existing one.

6. Then login to the prestashop admin back office

7. Under Configure > Advanced Parameters > Performance click on "Clear Cache" button

8. Now the margin gap horizontal in the classic template should be reduced to closer to one another.

Prestashop how to make the margin gap closer between product container


Prestashop 1.7.4.2 - How to remove hover line on classic template

The original classic template of the Prestashop 1.7.4.2 comes with the quick view thumbnail. It pops up when hovering over the product container - and it looks very annoying because it does not bring many purposes to the product on the show. However, it can be disabled the quick view feature by editing it in the product.tpl

After doing that there will no more hover element but there is one tiny thing left which the 128px long and 1px wide line and when you hover it keeps popping up. That is something not very good to see on the product container. Fortunately there is a way how to remove the hover line and follow the tutorial step below.

1. Open the Custom.css using FileZilla FTP and edit it using NotePad++

2. Copy CSS code below into the custom.css style file


#products .thumbnail-container:focus .product-description:after, #products .thumbnail-container:hover .product-description:after, .featured-products .thumbnail-container:focus .product-description:after, .featured-products .thumbnail-container:hover .product-description:after, .product-accessories .thumbnail-container:focus .product-description:after, .product-accessories .thumbnail-container:hover .product-description:after, .product-miniature .thumbnail-container:focus .product-description:after, .product-miniature .thumbnail-container:hover .product-description:after {
    border-top: none;
}

3. Save and re-upload to replace the existing one

4. Then login to the prestashop admin back office

5. Under Configure > Advanced Parameters > Performance click on "Clear Cache" button

6. Now browse to the prestashop and hover on the product container image the hover line should be gone.

how to remove hover horizontal line on prestashop quick view

Wednesday, November 7, 2018

Prestashop 1.7.4.2 - How to fix image not showing due to pagespeed

What is pagespeed module?


The pagespeed module is responsible for image compression that makes it load faster on Prestashop and thus increase the speed performance of your store significantly.

The problem of pagespeed module in Prestashop


However, not many people realize that the mod_pagespeed module use by the PrestaShop actually can cause very much headache to the user when uploading new images to their e-commerce site. Some people tweak image permission from 775 to 664 or whatsoever and clear cache including clearing cache of the pagespeed module via SSH console. All of these eventually solve the problem once and after reloading the image is not showing again.

This is what happens when upload image to the Store Contact and About us page of the store. After uploading the new image through the back office it works once when browsing the page - but it will be gone missing when reloading the same page again. After searching tutorial solution on Google like changing the CHMOD permission of the image from 775 to 664 or the other way around including clear cache as well as clearing cache of the pagespeed via SSH. After performing those action it fixed the first time reload but the next it will be missing again.

From the Chrome or Mozilla developer tools I can see that the image URL has been modified by the pagespeed like so with 404 ERROR on the browser alert.

<img src="http://xx.xxx.xxx.xxx/img/st/x1-stores_default.jpg.pagespeed.ic.NxmzWLdzMI.webp" alt="product" title="product">


Notice the image becomes like this: x1-stores_default.jpg.pagespeed.ic.NxmzWLdzMI.webp - due to the pagespeed compression. And if I change the URL to the actual image URL like so 1-stores_default.jpg on the developer debugging it will load correctly.

<img src="http://xx.xxx.xxx.xxx/img/st/1-stores_default.jpg" alt="product" title="product" data-pagespeed-url-hash="377239180" onload="pagespeed.CriticalImages.checkImageForCriticality(this);">

This is how I found out the pagespeed compression module is the real problem in this missing image case for Prestashop 1.7.4.2

How to solve the pagespeed image not showing?:


In order to fix the problem, we need to use FTP to access the directory where the file of pagespeed is located. In this case, I am using FileZilla to access the public location of the file in bitnami Google Cloud server.

1. Login to the server via FileZilla FTP

2. Local /opt/bitnami/apache2/conf/httpd.conf file in the directory

3. Edit the file using NotePad++

4. Now comment out these two lines in the httpd.conf file

Include conf/pagespeed.conf to read like so #Include conf/pagespeed.conf
Include conf/pagespeed_libraries.conf to read like so #Include conf/pagespeed_libraries.conf

5. Save the file and re-upload to the server via FTP again

6. Now open the Bitnami Virtual Machine Vault and Launch the SSH Console in a new browser

7. Once the console loaded restart the apache server using this command: sudo /opt/bitnami/ctlscript.sh restart apache

8. Now reload the page of Prestashop that having the missing image it should show all the time no matter how many times you visited or load the site.

Now if you inspect the element using developer tools on chrome or mozilla firefox you will the image is now loading its normal url without the compressed pagespeed element in it like so

<img src="http://xx.xxx.xxx.xxx/img/cms/product%20cctv%20and%20computers.jpg" alt="kuching cctv" width="400" height="400" />

There could be a better solution than this rather than disable the pagespeed but I am not too sure what it is. Perhaps tweaking the php logic in the one of those file might do the trick but you need it to work urgently the above solution is the fastest you can do.