I am using Bitnami to install PrestaShop e-commerce application on Google Clouds - but the difficult thing is how to manage them via ftp in this case FileZilla free ftp. So this is the step how to access the Bitnami PrestaShop directories, folders, and files via the FileZilla.
Step 1: Getting SSH Key, Username, and External IP of Bitnami Virtual Machine Vault
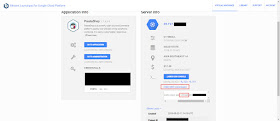
Go to Bitnami Virtual Machine vaults and you will find the following info.
Take note External IP address of the installed PrestaShop for example 35.197.xxx.xx
Open the show the SSH command you will find codes like ssh -i [your-private-key].pem bitnami@35.197.xxx.xx take note the Bitnami is the default username for the SSH to the Bitnami Google Clouds server.
Download the .PPK key under the LAUNCH SSH CONSOLE and keep it somewhere in your folder safely. Your FileZilla will need it to access the Google Cloud Bitnami virtual machine all the time using this SSH key.

Step 2: FileZilla parameters configuration
Open the FileZilla and if you don't have one - please download and it's free to use. So in FileZilla
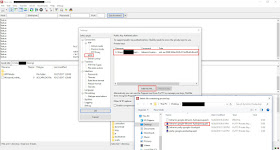
1. Go Edit > Settings
2. Click on the SFTP add the PPK key that you downloaded from Bitnami Virtual Machine Vault
3. One that done click OK

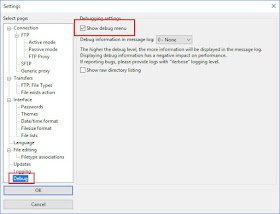
Step 3: Debut setting
Still, in Settings click on Debug and tick "Show debug menu" and click OK

Step 4: Connecting FileZilla to the Bitnami Virtual Machine Google Clouds server. Do the following action on FileZilla.
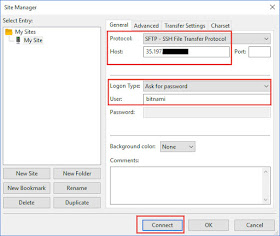
1. Click on File > Site Manager
2. Add new site by clicking the "New Site" button you can give it any name for example "My Site"
3. Set the Protocol = SFTP - SSH File Transfer Protocol
4. Host = The External IP address obtain in step 1 from the Bitnami VM vault example 35.197.xxx.xx
5. Port = empty
6. Logon Type = Ask for password
7. User = Username obtain in step 1 from the Bitnami VM vault
8. Click Connect when it prompt for password just leave it empty and click OK
9. Once connected to the server you will see the all the directories, folders, and file in the server

Error Signal:
If you encounter this error most likely the username or the IP is wrong - because the PPK key need it to be correct to connect correctly
Error: Disconnected: No supported authentication methods available (server sent: publickey)
Error: Could not connect to server
No comments:
Post a Comment